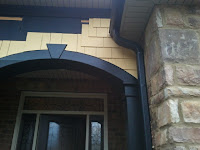
 Now for the fun part: installation. I had to do some prep work, however, before I could start installing the shingles. This wasn’t so much fun. My arches are made out of ¾-inch thick material. You should have a minimum of 1 inch. When you overlap the shingles, they will stick out about ¾ inches. It won’t look good if you have your shingles sticking out past your trim board. So this meant I had to tear off my arches and put something behind them. The carpenter bees had done a job on them anyway so I needed to fill some holes and repair. I just used a piece of Hardie plank siding behind them to bring them out to 1 inch.
I followed the installation instructions as closely as possible. I installed aluminum flashing over my arch trim boards and used roofing felt as a vapor barrier over my original siding. The flashing was probably overkill for my application since only blowing rain will hit the shingles. I wanted to protect my trim boards as much as possible though. They are made of poplar and were originally stained. Had I realized I was going to have a carpenter bee problem, I would have made the arches out of some other material since now I’ve had to resort to painting them. I’ve read that paint will deter them much more than stain. We shall see next season.
After you get any flashing and vapor barrier installed, you’ll then want to put a small starter strip near the bottom and run a piece of 8-inch wide siding on top of that. The reason for doing this is to get your angle started on the shingles. As the shingles overlap each other, they end up lying at a certain angle and it will look best if you maintain that angle. The grain will run in the opposite direction from that on the shingles, but you do not notice it in the quarter inch gap you leave between the shingles. As I said earlier, start at one end and work your way over. I did this all on a ladder, so I worked two or three rows at a time. I also had to get around the arches, which necessitated I work up to the top of the arch and then move over. Each row should offset 16 inches just like it says in the installation instructions.
So how do you get the shingles cut close to the arch? Professional installers probably have tricks for doing this and would laugh at my methods, but I used paper out of my printer. A sheet of 8.5 by 11 paper is very close to your shingle sizes. I stuck a piece of paper up there and traced my curve to make the pattern. This is where I was really thankful I wasn’t working with the 4-ft shingle panels. I would have struggled to get the curve drawn on them just right. I probably would have had a lot more waste. After I made my pattern and traced the curve on the shingle, I used my jig saw to make the cut. There is a special jig saw blade for cement fiber board. One blade lasted me through the entire project.
You have to seal the edges after cutting. So I kept my little roller and some paint handy to seal the edges. You don’t have time to wait for the paint to dry so plan to get a little paint on your hands. This is where it is important that you have the matching paint. I used more than a half-gallon of paint on this project. I’m not sure how much paint you get with the Hardie touch up kits, but it better be a lot. Otherwise you are better off with the primed siding and painting it yourself.
Nails are another issue. The installation instructions tell you the size to use, but good luck finding nails that have the dimensions specified. The nail specifications went beyond my knowledge. I even asked someone at Home Depot and they didn’t really know. I didn’t find any nails that said they were specifically made for Hardie siding. But I did find galvanized, ring shank siding nails that were 1 and 5/8 inches long. It’s not easy hitting these nails through cement fiber board so I predrilled a few holes at first. I finally was able to forego the pre-drilling.
When I got near the top and needed to cross-cut the shingles, I just scored them and broke them. This was pretty easy to do. The edge was a little rough, but it was going to get covered up anyway.
(Caution: always follow the manufacturer’s instructions and best safety practices.)
Next time: project costs and savings
